First of all, say the title fast five times. Go on! I dare you!
Ok, now that we have that out of the way…
Sourdough Starter!
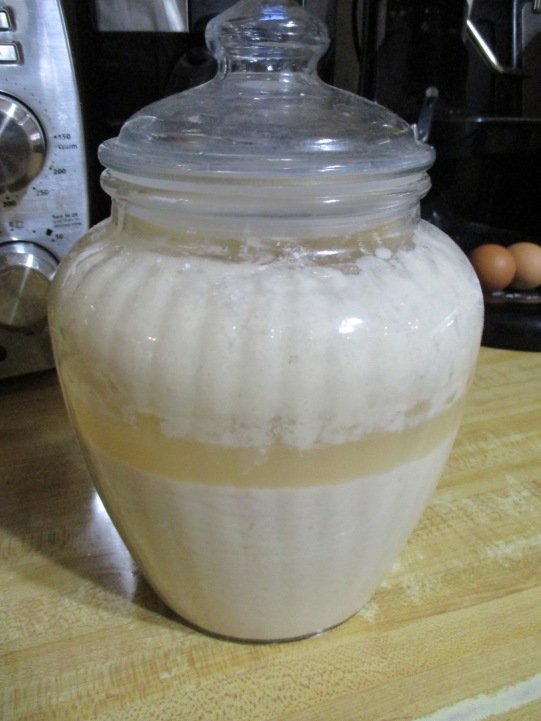
It’s high time that I introduced you to Luther!
Luther is my sourdough starter. He’s been percolating on my counter for a few year now, the latest in a line of starters that I’ve tried to keep alive – and so far the most successful. Starters can be temperamental; most have died through neglect (they tend to get moldy and disgusting if you don’t use them regularly). And of course, each of the previous starters were named also (inspired by Sweet Herman, who was going around a few decades ago); there has been Zinzendorf, Erasmus and Calvin – all named after reformers.
Each has a distinct character. The flavor is effected by weather and ingredients, how often you attend to them, and other nameless factors. Luther is surprisingly sweet and good tempered, assertive yet pleasant; and curiously seems to get sweeter with a little neglect.
To make your own (a fun hobby!), just mix:
2 cups white flour
2 cups water
2 cups of (unsalted) water used to boil potatoes
1 Tbsp. dry yeast
a drizzle of honey
Leave in a covered glass bowl for a week so that it collects natural yeast from the atmosphere. Or, buy a special jar for it like I did!
After a week, you can use it to make all kinds of recipes – bread, biscuits, cupcakes, pancakes. The starter must be used on a weekly basis (otherwise, you know, mold and stuff…); with every use, feed the starter with a cup of water and a cup of white flour. I do make an exception and use only white flour for this, since wheat flour doesn’t behave as well.
By the way, don’t let the might-get-moldy part turn you off. This whole process is a bit of a science project – yeast is a fungus which makes bread rise by expelling gases, etc. That’s part of the fun of baking; making something delicious out of what belongs in a lab! The results are lovely.
And there you go! Go on, make up a batch of starter, and next week I’ll share one of my favorite recipes!
So onto 12. Talk about a hobby or something you’re passionate about
Ethnic (doesn’t matter what ethnicity) cooking is my hobby. Actually, it’s definitely more of a passion. Sarah mentioned in an earlier post that we love the cooking from different countries, and one of them is French cooking.
A few years ago, I asked for a French cookbook as a present for my birthday, a cuisine we as a family had not really delved much into. I got this lovely, interesting, fun and useful cook book about Provençal cooking. Here is the link for it on Amazon.
It’s not fancy, but goes more in for rustic, hearty, Mediterranean-style cooking, which is totally my type of cookbook. I will someday get into the fancier styles of French cooking, but I love this cookbook so much that I’m fine waiting for that day for a while!
Anyway, I wanted to write a post on one of my favorite recipes in this cookbook – the Basil-Scented Vanilla Ice Cream. When I first saw it, I thought it would be really weird, but actually, having made it a few times now, it has to be one of my favorite homemade ice creams!
Our home grown basil, of the purple opal variety.
I’ll give you the ingredients at the bottom of the post, but I’ll show you how I went through the steps here.
How I Did the Recipe
It starts off with heating the milk with the vanilla beans, over a low heat, in a heavy saucepan. Bring this to a gentle boil, the bubbles just starting around the edges, just a little past scalding the milk. Then you simmer it for about five minutes. Turn off the heat and leave it covered for about 30 minutes. (This is steeping the vanilla in the milk, so it becomes really infused with the vanilla flavor.)
I’ll just say here, I didn’t do this step all the way, because we make our own vanilla with the seeds all happily dancing around at the bottom of the bottle, and vanilla is certainly not the cheapest of commodities, so I just went with a little of our homemade extract, and didn’t let the heated milk it sit for quite as long.
While it’s sitting around, getting all flavored, you separate the eggs, (and keep the egg whites for wonderful Chocolate Meringues later on!) and then you take those lovely yellow yolks and the sugar (I like to add less sugar than they call for, since I don’t always like my ice cream the sweetest) and then you whip them, and whip them, and whip them, until they become light and fluffy. Really, they do – it’s kind of awesome! Sort of a pale, lemon yellow. I love eggs – they really are magical!
Now you take your milk, and if you have the vanilla bean in it, you can strain that out, but leave the seeds in it. It makes it look really cool later on. Pour it over the egg mixture, really slowly, so you don’t cook the eggs all of a sudden. Doing it slowly is called tempering the eggs (I learn all of these cool terms from my mum who taught us good cooking techniques – thanks Mum!) and whisk the mixture up vigorously while you pour it in.
The eggs and milk and sugar in a metal bowl
Then they put it back in the saucepan, but I actually use my double boiler system, where you use a heat resistant bowl (like metal), and put it over a big saucepan of greater size than the bowl. The pan has a little bit of boiling water at the bottom, not enough to touch the bowl once it’s sitting in the pan, but enough to steam the whole thing through. Of course, if you actually have a double boiler, then you don’t need all this set up – you’ve got it already figured out.
You can see here the delightful yellow color, courtesy of the egg yolks
Now you heat it very slowly, over a pretty low heat so you don’t curdle the eggs. (The double boiler helps with this part, since it makes it really gentle heating.) And you stir it constantly, although I had to do something elsewhere for a moment and it did fine. Heat it till it’s really steaming, but make sure it doesn’t actually boil. That would be disastrous. I’ve done that before. Sort of like sweet, ice cold cottage cheese. Weird.
But now that it’s all getting properly heated up, you can test to see if it’s done by seeing if it coats the back of a spoon. It won’t coat unless it’s actually done, but once it’s coating, then you take it off the heat and put it in an ice bath. And really, I would suggest the ice bath, since even after you take it off of the heat it will keep on cooking unless you cool it off. But it went really quickly, actually, and it was cool enough in no time to go on to the next step.
Sitting in the ice bath. (It really looks small, doesn’t it? But I think it’s an optical elusion!)Minced basil on my favorite cutting board, and my favorite knife, both Pampered Chef!
Now you whip up your crème fraiche (it’s sort of like sour cream) or, in my case just use the same amount of cream, or a little more (I wanted to make the recipe stretch, so I added more, plus a little extra milk) and you pour this into the custard. And now you stir in the basil, all minced up into pretty small pieces.
And now you pour this lovely, yellowy, purple-speckled mixture into your ice cream maker. We have the Cuisinart Ice Cream Maker, which works wonders in our house!
At about 25-30 minutes, the mixture has turned into a frozen, sweet, smooth, ice cream that has a little herby, piquant bite from the basil. Really yummy, trust me! But you’ll have to make it to see for yourself. See, I’ll show you a picture of my scoop, just barely melting in the bowl, and absolutely wonderfully melting in the mouth!
Basil Ice Cream
Oh, and before you give yourself a scoop right out of the freezer bowl, it really does help to put it into another container and freeze it for a bit. Not too long, but just enough to make it really frozen. The Ice Cream Maker has done the hard bit of braking up the ice crystals as it’s freezing it, but it’s helpful to finish it off in the freezer.
I’m beginning to think that I don’t enjoy any other ice cream quite as much as I love our homemade stuff. The freshness, the clarity of flavor, and the lack of weird additives really makes a difference. And that goes for our frozen yogurt and the other frozen delights, too.
I’ll just write out the ingredients as it appears in the cookbook, with the variations that I did in parentheses.
Well, I hope you enjoy this recipe as much as I do. I hope to be doing a lot more of these cooking posts in the future, so you can see more of the fun things that we work on in our kitchen.
After checking out an early post of fellow newbie-blogger Jessa from The Life of Jessa, I saw a link in her post to an interesting article on another blog.
It wasn’t my kind of a blog (A Girl, Obsessed, that is). That, being said, I really liked the one post that Jessa referenced. Here’s the post. All about 25 new ideas to post for newbie bloggers.
So Abigail, Sarah and I are going to do just that – 25 new posts of a bloggy, a little different-than-our-normal-style posts, so you, our wonderful readers can get to know us a little better. I’ll take one post idea, Abigail takes the next, and Sarah takes the next, and so on… not necessarily in that order. And we might have to repeat some of them, from a different perspective, or whatever happens to work.
Anyway, look for these new kind of posts in the next few days (and weeks!). And if anyone else has any other blog ideas that we could use (anything you’d like to know about our shops, or about how we work on our items, or just about us) then please leave a comment. We’d love to hear from you!